A Deutsch connector is the reliable choice for demanding applications in transport and industry. Designed for performance under extreme conditions, it is widely used under the hood, in the chassis, and in the cabin.
With a robust housing made of V0-rated thermoplastic, this connector offers excellent resistance to UV radiation, high temperatures, and harsh environmental conditions. The advanced silicone seals provide reliable protection against dirt and moisture, with a protection rating of up to IP68. Additionally, the Deutsch DT series supports the round contact system of size 16, with a current capacity of 13 amps, making it ideal for situations where performance and reliability are a priority.
Why are Deutsch connectors perfect for vehicle lighting?
Vehicle lighting requires an electrical connection that can withstand shocks, vibrations, and exposure to extreme weather conditions. Deutsch connectors provide exactly that. Thanks to their robust construction and high-quality sealing, they protect electrical connections from moisture, dust, and corrosion, even in challenging environments.
This makes them a reliable choice for lighting applications such as headlights, taillights, and work lights. Moreover, their modular design makes it easy to organize and secure complex wiring in vehicles. As a result, your lighting and electrical systems will always function optimally, regardless of the conditions.
DT connector
The DT series by Deutsch is designed for applications requiring a robust, reliable connection in demanding environments. These connectors support cable sizes ranging from 0.5 mm² to 4.0 mm² and can handle a current of up to 13 amps. They are water- and dustproof according to IP68 standards, making them ideal for use in agricultural machinery, construction vehicles, and other harsh conditions. Choose the DT series when you need a powerful, durable solution for applications such as lighting, motor control, or other electrical components with medium power requirements.
DTM Connector
The DTM series is designed for signal transmission and applications where space is limited. These connectors are more compact than the DT series and suitable for cable sizes from 0.5 mm² to 1.0 mm², with a maximum current capacity of 7.5 amps. Like the DT series, the DTM series offers IP68 protection, making them ideal for use in electronic systems such as sensors, ECUs, and other light signals. If your project focuses on precision and space efficiency, DTM connectors are the ideal choice.
Features and Differences Between DT and DTM Connectors
| characteristic | DT-Serie | DTM-Serie |
|---|---|---|
| Application | Middelgrote stroomtoepassingen (verlichting, motoren, etc.) | Signal applications (sensors, ECUs, etc.) |
| Cable capacity | 0.5 mm² to 4.0 mm² | 0.5 mm² to 1.0 mm² |
| Physical size | Larger, more robust | More compact |
| IP Rating | IP68, IP6K9K | IP68, IP6K9K |
| Amperage | Up to 13 amps | Up to 7,5 amps |
| Suitable for | Heavier environments, requiring more robustness | Compact installations, light signals |
| Industries | Automotive, agriculture, construction machinery, lighting | Sensors, finer electronic applications |
| Temperature range | -55°C to +125°C | -55°C to +125°C |
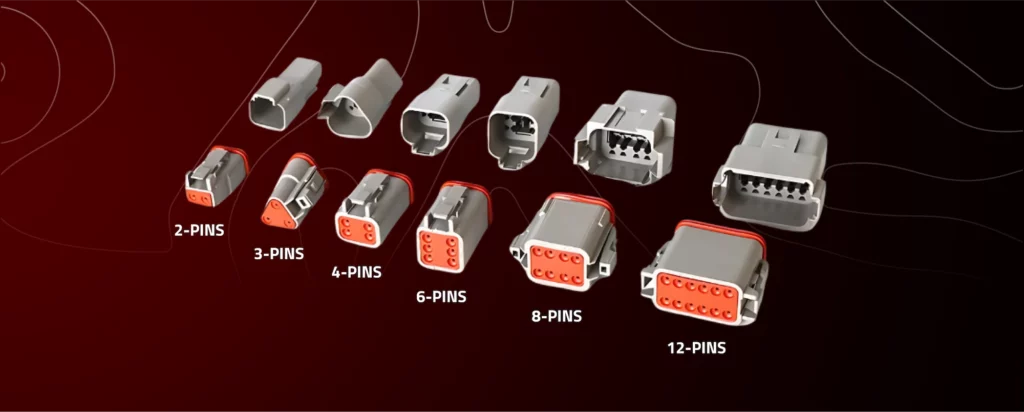
Pin configurations
There are two different types of Deutsch connectors: the male and the female version. The male Deutsch connector (also called a plug) has a solid pin as the central conductor. A female Deutsch connector (also called a jack) has a central conductor with a hole to accommodate the male plug. In addition to the male and female versions, the connectors are also available with various connections. This ensures that there is always a connection available for your lamp. The different types are listed below:
- 2-Pins male/female
- 3-Pins male/female
- 4-Pins male/female
- 6-Pins male/female
- 8-Pins male/female
- 12-Pins male/female
Although many people assume that "Deutsch connector" refers to Germany, the name actually comes from Alex Deutsch. His connectors, however, have built such a global reputation that they have almost become synonymous with reliability.
Connection Deutsch connector
Connecting a Deutsch connector
The correct connection of a Deutsch connector is as follows:
- Attaching the contacts: Insert the stripped cable into a metal contact (pin or socket). Use a special crimping tool to securely attach the contact to the cable. A proper crimp connection is essential for a reliable electrical connection.
- Confirmation of the contacts: Place the stripped cable in a metal contact (pin or socket). Use a special crimping tool to firmly secure the contact to the cable. A proper crimp connection is essential for a reliable electrical connection.
- Locking: Insert the green wedge (also known as a wedgelock) at the front of the connector and press it firmly until it clicks into place. This wedge provides extra locking and prevents the contacts from coming loose.
- Locking: Place the green wedge (also called a wedgelock) at the front of the connector and press it firmly until it clicks into place. This wedge provides additional locking and prevents the contacts from coming loose.
Did you know that Deutsch connectors play a crucial role in rally sports? During intense races over muddy trails and rocky terrains, they ensure flawless electrical connections, even under the most severe vibrations and shocks.
Frequently asked questions
What is a DT connector?
A DT connector is a type of Deutsch connector from the DT series, designed for applications up to 13 amps continuous. This series is known for its durability and reliability in demanding environments.
Why choose a Deutsch connector?
Deutsch connectors provide excellent protection against environmental factors such as water, dust, and vibrations. They are modular, easy to install, and renowned for their reliability in critical applications.
Are Deutsch connectors waterproof?
Yes, Deutsch connectors are designed with seals that provide protection against water and dust, making them suitable for use in humid and dusty environments. Most connectors have an IP68 rating.