Choosing the right lighting for your trailer might seem like a technical issue, but it actually revolves around practical considerations. Let's delve deeper into the choices you have and how you can make smart decisions.
In this blog you will find:
- A step-by-step guide for assembling a trailer lighting kit
- Explanation and options for the trailer wiring harness

Assembling the right lighting kit starts with determining your needs and preferences.
Step 1: Assess the current situation
Start by assessing what is currently under your trailer and how it is connected. This will help you determine which parts you can reuse or need to replace. How much cable length do I need, and what type of connection does my vehicle have? Usually, replacing the entire wiring harness is most efficient, rather than continuing with the old wiring, which may have invisible breaks or other issues.
Step 2: Functions and size
Now it gets interesting. Choosing the lighting is naturally the most enjoyable part, and there is a wide range of beautiful options available. Ask yourself the following questions to make the right choice from all the possibilities:
- Tail Lights: What space do you have for the tail lights and what functions do you want integrated into the lamps? What type of connection do you need? An exposed wire end or another connection type?
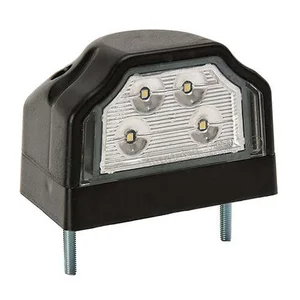
- License plate lights: Do you want this integrated in the tail light or separately next to it? Both options are possible. For example, this rear light with integrated license plate light.
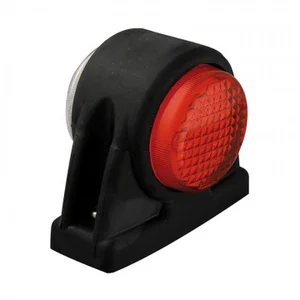
- Side marker lights: They enhance the visibility of your trailer, especially at night.
- Breedtelampen: Deze geven de breedte van uw aanhanger aan, een stuk extra veiligheid dat verplicht is bij aanhangers breder dan 160 cm. Ook handig bij het achteruitrijden zodat u de achterzijde van de aanhanger in zijn geheel goed kunt zien.
- Reverse light: Handy when reversing in the dark, also usable as a work light (available with ECE R23 certification)
- Fog lights: At least one fog light is required, usually integrated into the rear light but also available separately.
- Reflectors: Reflectors are essential for the visibility of your trailer, especially in the dark. They ensure that other road users can see your trailer clearly. Reflectors are available in various shapes and sizes, such as rectangular or round, and can be easily mounted on the trailer.
- Wiring harness: A good wiring harness is essential for the electrical connection of all your lights. Ensure the wiring harness is of high quality and provides sufficient connections for all the lights you want to install. A good wiring harness makes installation easier and ensures reliable operation of your lighting.
- Wiring harness: Een goede kabelboom is essentieel voor de elektrische verbinding van al uw verlichting. Zorg ervoor dat de kabelboom van hoge kwaliteit is en voldoende aansluitingen biedt voor alle lampen die u wilt installeren. Een goede kabelboom maakt de installatie eenvoudiger en zorgt voor een betrouwbare werking van uw verlichting.
Step 3: Choosing the right connector
If you decide to order a complete new wiring harness, make sure it has the same connector as the tail light. You can also opt for a tail light with an open wire connection.
Step 4: additional options
By now you have a good idea of what you need. However, we have some additional options that we would like to mention:
Side lights that blink along This feature ensures that the trailer side lights blink synchronously with the turn signals of the towing vehicle. This enhances the trailer's visibility, especially during turns, making other road users more aware of your intentions. Check out the range of synchronized side lights.
Canbus-proof lighting Slightly more expensive to purchase, but with greater certainty. Canbus-proof lights offer an innovative solution for modern vehicles with complex electrical systems, such as many new cars and trucks. These bulbs are specially designed to work with the Canbus system, which detects error messages when a bulb has burned out or is not functioning correctly. Using Canbus-proof bulbs helps prevent these error messages, ensuring no warning lights on your dashboard and no risk of malfunctions in other electronic systems of your vehicle. This makes Canbus-proof bulbs a reliable choice for modern vehicles, providing peace of mind that your lighting system will operate smoothly.
Canbus control box: If the rearlight you want to choose isn't already Canbus-proof, adding a Canbus control box can be a smart solution. This plug & play system is very easy to connect.
This converts the low power of the LED lamps to a higher power, matching the requirements of the onboard computer as if they were halogen lamps. This control box acts as an intermediary between the non-Canbus tail light and the Canbus system of your vehicle.
View it here: LED control box 13-pin 12V
Side marker with pin connectors
Side markers with pin connectors offer a convenient solution for adding additional lighting to your trailer or vehicle. These side markers come with pin connectors, allowing you to easily connect them to existing wiring without the need for tools. This makes the installation process quick and straightforward, even for those with limited technical knowledge. Moreover, the pin connectors ensure a reliable connection that withstands vibrations and other impacts while driving. By using side markers with pin connectors, you not only enhance the visibility and safety of your vehicle but also save time and effort during installation.
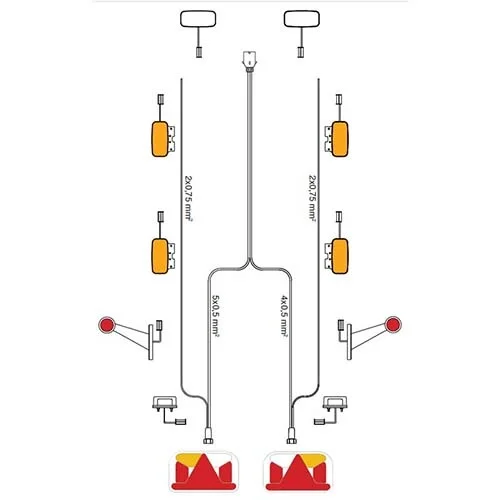
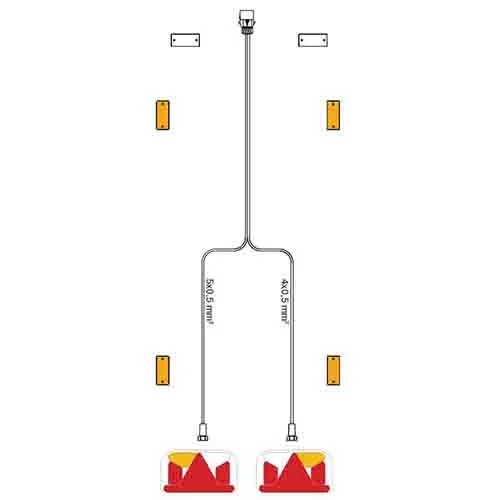
Now that you know which lamps you want to install on your trailer, you can assemble the wiring harness. There is a wiring harness available for every requirement, whether it's a 7-pin, 13-pin, 5-pin, or 8-pin connection to the lamp. View all wiring looms.
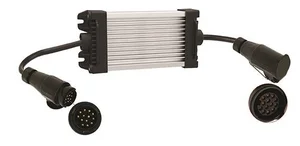
Connection cables
Always handy to have when you need to hitch up a trailer with the wrong connection. TRALERT® offers a range of connection cables from 13-pin to 7-pin and from 7-pin to 13-pin to easily solve this problem.
Pro tips:
Always leave extra space for connection.
Always keep an extra half meter clear from the drawbar to the car. This is necessary to accommodate bends and ensure proper cable connection.
Waterproof trailer lighting
Especially when using your trailer in wet conditions, it's important that the lighting is waterproof. Look for lamps with a high IP rating such as IP68 (waterproof), IP69 (high-pressure resistant) or IP69K Resistant to hot high pressureBy choosing IP69K-rated lighting, you ensure a durable and reliable lighting system that is not only resistant to water but also to the harshest weather conditions.
Connecting your trailer lighting
Need tips on connecting trailer lighting? Read our article on Connecting 7-pin and 13-pin trailer lighting with wiring diagrams